


Intro
Well, well, well, I've been away for a while but I've come bearing gifts, in this piece we'll have an overview of how to implement crypto payment as a seamless payment option to your eCommerce application using the 100Pay APIs.
Transition beyond the mundane Fiat compatibility and give your application extra flexibility with 100Pay. 100Pay is a platform that offers everyone; IaaS, PaaS and SaaS a means to accept cryptocurrency payments. 100Pay supports over 20 Cryptocurrencies and syncs with over 10 Blockchains which gives much needed versatility.
There are a few means to integrating the 100Pay payment checkout in your application such as SDKs, API endpoints and a coverage of client and server side libraries which supports several languages/frameworks ranging from React and Vue.js to Node.js and Python, depending on your preference you can refer the docs to get your know-how. However, in this article we'll be integrating the 100Pay checkout with her APIs using Node.js. Now enough with the hype, let's get down to business.
Logic
So the logic is quite simple, the goal is to generate a payment payload containing details such as amount, currency, billing address, customer details, network, recipient, transaction ID, wallet address, etc. This payload is used for payment from any preferred crypto platform that supports the network blockchain. The payment is then confirmed using a webhook. A webhook is a software architecture approach that allows applications and services to submit a web-based notification to other applications whenever a specific event occurs, in our case the event is a payment. Under the hood, webhooks are regular HTTP requests and are handled as such. The webhook is basically an endpoint in your API that you'll setup independently to handle event notification, we'll set this up later in the article.
After payment, a notification is sent to your webhook, this notification is then verified by a secret key that you will also setup later on both your code and your 100Pay account to validate that the payment payload is genuine.
The payload 100Pay sends to your server is of this structure:
NOTE: this is just dummy data...
{
    "charge": {
        "customer": {
            "user_id": "001",
            "name": "Isreal Hogan",
            "phone": "+2347000000000",
            "email": "hoganizy85@gmail.com"
        },
        "billing": {
            "currency": "NGN",
            "vat": 0,
            "pricing_type": "fixed_price",
            "amount": "600",
            "description": "Payment for your Shop100 Order",
            "country": "NG"
        },
        "status": {
            "context": {
                "status": "overpaid",
                "value": 491.45
            },
            "value": "overpaid",
            "total_paid": 1091.45
        },
        "ref_id": "966795153",
        "payments": [
            {
                "network": "algorand",
                "transaction_id": "JOVSHQ6XZSAXE7A6JWUV4H34ODNDTEVHIKZJANIAOOD6ZH5K452A",
                "status": "CONFIRMED",
                "timestamp": "2023-03-29T03:04:39.615Z",
                "value": {
                    "local": {
                        "amount": 155.92384371911047,
                        "currency": "NGN"
                    },
                    "crypto": {
                        "amount": 1,
                        "currency": "ALGO"
                    }
                },
                "block": {
                    "height": null,
                    "hash": "JOVSHQ6XZSAXE7A6JWUV4H34ODNDTEVHIKZJANIAOOD6ZH5K452A"
                }
            },
            {
                "network": "algorand",
                "transaction_id": "POKAKNBB3ZOXC7MK2QTXR65UA3R4OYDGDV2RWFHQP4YYZ5DKGHAQ",
                "status": "CONFIRMED",
                "timestamp": "2023-03-29T03:04:54.636Z",
                "value": {
                    "local": {
                        "amount": 311.84768743822093,
                        "currency": "NGN"
                    },
                    "crypto": {
                        "amount": 2,
                        "currency": "ALGO"
                    }
                },
                "block": {
                    "height": null,
                    "hash": "POKAKNBB3ZOXC7MK2QTXR65UA3R4OYDGDV2RWFHQP4YYZ5DKGHAQ"
                }
            },
            {
                "network": "algorand",
                "transaction_id": "JHT3RK2KQHMLKA24QR7JLPWXIMX7O2J4KKF7TL2I3NRVLC7RDELQ",
                "status": "CONFIRMED",
                "timestamp": "2023-03-29T03:09:38.251Z",
                "value": {
                    "local": {
                        "amount": 623.681562705202,
                        "currency": "NGN"
                    },
                    "crypto": {
                        "amount": 4,
                        "currency": "ALGO"
                    }
                },
                "block": {
                    "height": null,
                    "hash": "JHT3RK2KQHMLKA24QR7JLPWXIMX7O2J4KKF7TL2I3NRVLC7RDELQ"
                }
            }
        ],
        "charge_source": "external",
        "createdAt": "2023-03-29T02:16:13.825Z",
        "_id": "64239ff59b4e7700379c2106",
        "metadata": {
            "order_id": "64239ff4d1460e004b199e04",
            "charge_ref": "64239ff4d1460e004b199e04",
            "customer_id": "622f8f67f8c81600420d7769",
            "store_id": "62bee01ccbec51004d585ee1",
            "store_email": "joshuabrendan5@gmail.com"
        },
        "call_back_url": "https://web.shop100.store/thank-you-page/",
        "app_id": "642367e95f09730038029f87",
        "userId": "642366ba5f09730038029f55",
        "chargeId": "64239ff59b4e7700379c2106",
        "__v": 0
    },
    "new_payment": {
        "network": "algorand",
        "transaction_id": "JHT3RK2KQHMLKA24QR7JLPWXIMX7O2J4KKF7TL2I3NRVLC7RDELQ",
        "status": "CONFIRMED",
        "timestamp": "2023-03-29T03:09:38.251Z",
        "value": {
            "local": {
                "amount": "623.68",
                "currency": "NGN"
            },
            "crypto": {
                "amount": 4,
                "currency": "ALGO"
            }
        },
        "block": {
            "hash": "JHT3RK2KQHMLKA24QR7JLPWXIMX7O2J4KKF7TL2I3NRVLC7RDELQ"
        }
    }
}
Implementation
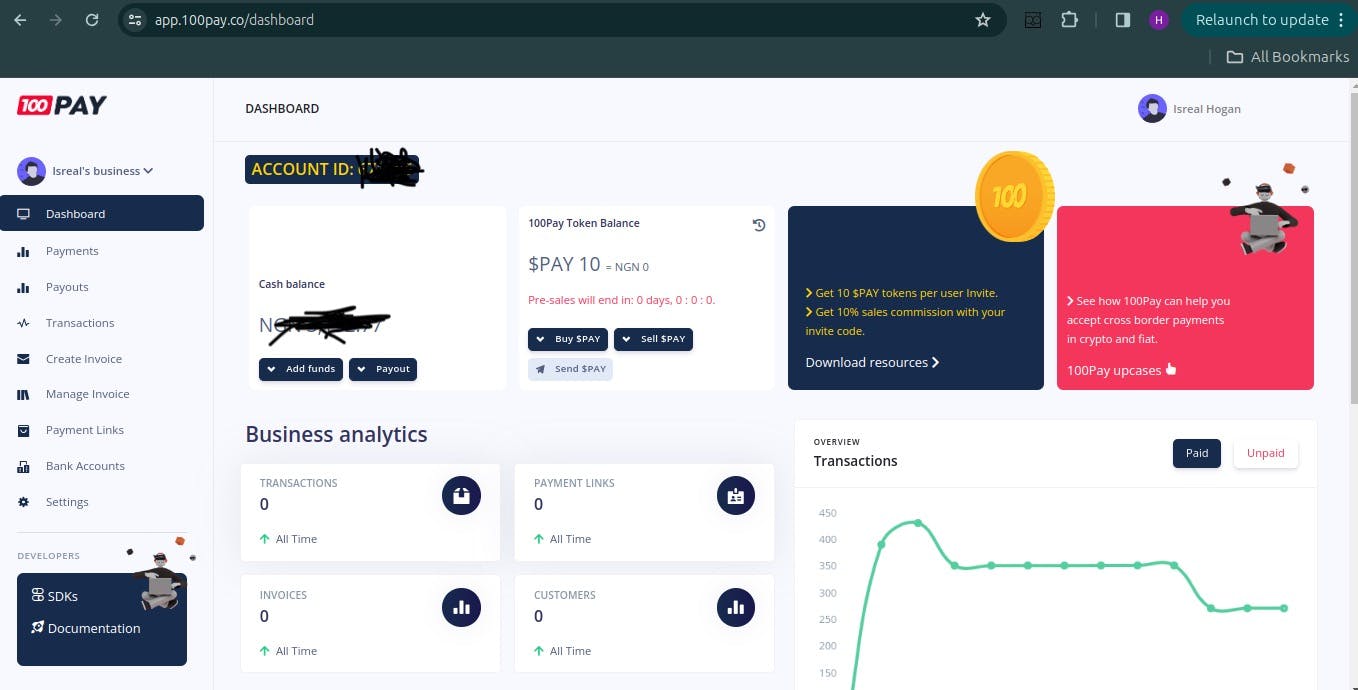
Step 1: create a 100Pay account by heading to the official website and signing up. Your account will be used to generate public/secret keys associated with your account, this will be needed for third party integration. After a successful signup, you will be met with a dashboard that currently looks like this:
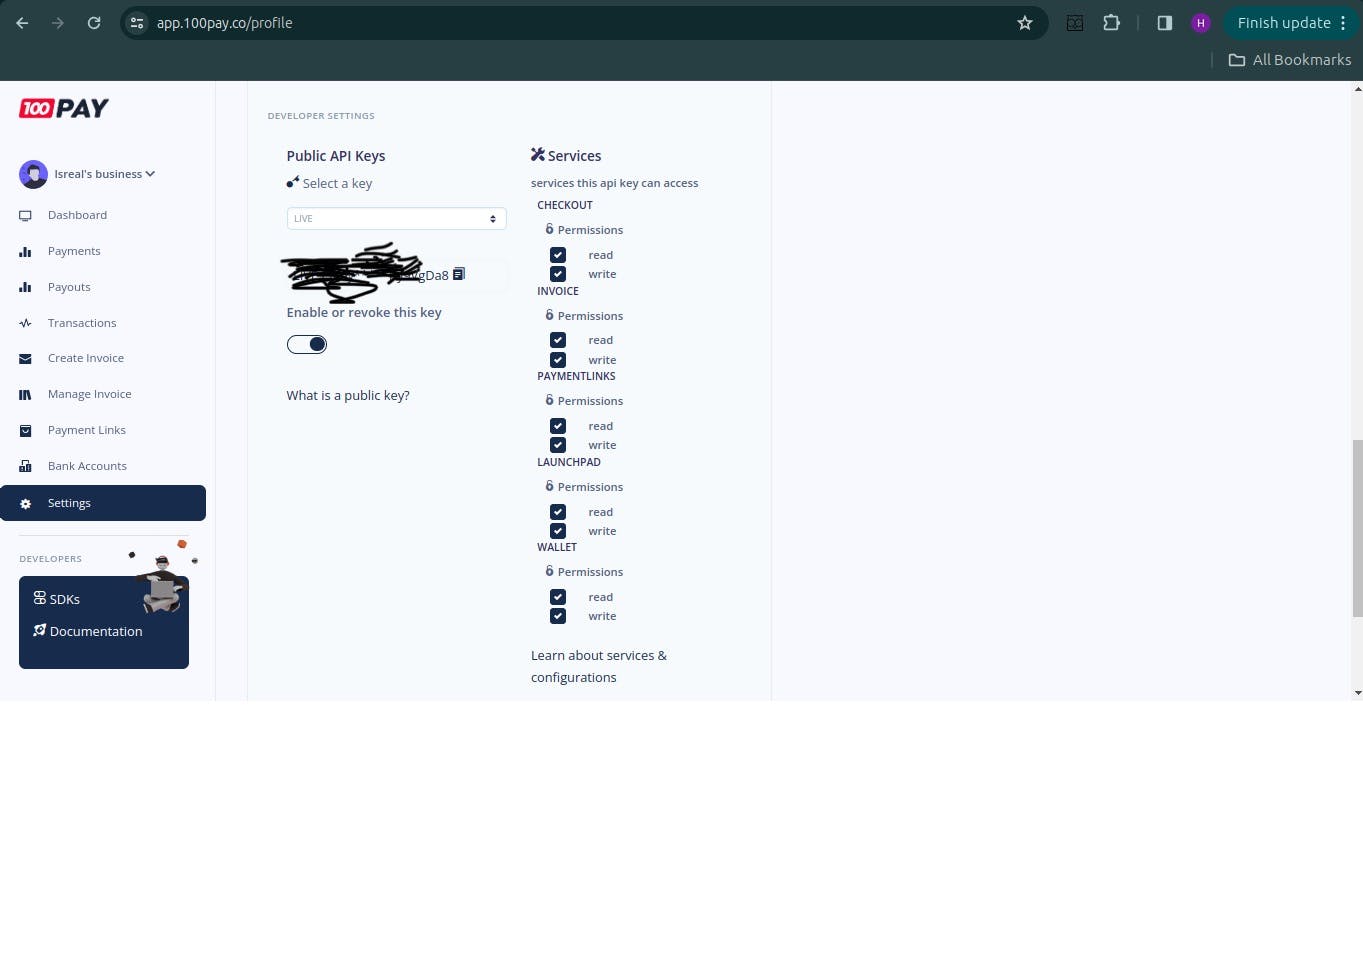
Step 2: next, navigate to the settings menu from your dashboard, here you'll get your public key which you'll provide in your request headers in order to generate the payment payload.
Step 3: the third step is to create a payment charge. We will do this by calling the 100Pay endpoint with axios. If you don't have axios installed then run this command: npm install axios. As earlier mentioned, we'll be using Node.js in an ES6 syntax for implementation. Next, create a file and add the following code, I'll name this file paymentController.js
import axios from "axios";
import { json } from "express";

export const createPaymentCharge = async (data) => {
  try {
    let config = {
      method: 'post',
      maxBodyLength: Infinity,
      url: 'https://api.100pay.co/api/v1/pay/charge',
      headers: {
        'api-key': process.env.PAY_API_PUBLIC_KEY,
        'Content-Type': 'application/json'
      },
      data: data
    };
    const response = await axios.request(config);
    return response.data;
  } catch (error) {
    return json(error) ;
  }
};
The code above uses an axios post method to call the 100Pay Endpoint that creates a payment charge with the data parameter. It sets your API key as a request header, this key is the public key you got from your 100Pay dashboard, in my case I added it as an environment variable for extra safety and then referenced it in my function, easy peasy.
Step 4: create an endpoint that executes the create payment charge feature:
import { createPaymentCharge } from "../controllers/paymentController.js";
import { Router } from "express";
export const paymentRouter = Router()

paymentRouter.post('/create-payment-charge', async (req, res) => {
    try {
        const { customer, billing, metadata, call_back_url, ref_id, charge_source } = req.body
        if (!req.body) {
            return res.status(400).json({ error: 'No data provided' })
        }
        const payment = await createPaymentCharge({ ref_id, customer, billing, metadata, call_back_url, userId, charge_source })
        return res.status(201).json(payment)
    } catch (error) {
        res.status(500).json({ error: error.message })
    }
})
This route is setup to create a payment charge, it requires that the user fills in certain fields to be parsed into the request body such as amount, currency, value, etc, you can reference the earlier payload sample for the structure of this data. On successful charge creation, the endpoint returns a couple of metadata, among this data is the hosted_url, this URL leads to a payment popup that looks like this

As seen, this 100Pay popup offers various selection of cryptocurrencies that the user can pay with such as BTC, USDT, XRP, etc. After crypto selection, a wallet address & QR code is generated for the payment, you can add the wallet id or scan the QR code from your crypto platform and specify the blockchain network to make payment. Hold your horses though! we need to add a webhook verification first before you can proceed to make a payment.
Before we create a webhook to handle the event notification, we will first create a schema that stores the event data that hits our webhook in our Database for extra verification purposes.
Step 5: Create a mongoose schema for the necessary payload details, the structure of this schema field is based on your choice, it really depends on how much data on the transaction you want to store in your database. In your schema file, add the following: webhookSchema.js
import mongoose from "mongoose";

const PaymentSchema = new mongoose.Schema({
    transaction_id: {
        type: String
    },
    network: {
        type: String
    },
    status: {
        type: String
    },
    value: {
        local: {
            amount: Number,
            currency: String
        },
        crypto: {
            amount: Number,
            currency: String
        }
    }
}, {
    timestamps: true
} );

export default mongoose.model('Payment', PaymentSchema);
This code creates a schema with the fields: transaction_id, network, value, status, etc. These specified fields will be filled from the event data and added to our Mongo DB Payment collection.
Step 6: Create a function that checks if the incoming payload's transaction id already exists in your database, this adds a layer of security to your application to invalidate dual transactions. In the case that the transaction Id doesn't exist which means the transaction is new and valid, it creates a new entry in our DB collection. I'll name this file webhookController.js:
import Payment from "../models/paymentSchema.js";
import { json } from "express";

export async function isPaymentProcessed(transactionId) {
    const existingPayment = await Payment.findOne({ transaction_id: transactionId });
    if (existingPayment) {
        return true;
    } else {
        return false;
    }
}

export async function updateDatabase(payload) {
    const newPaymentTransactionId = payload.data.transaction_id;
    if (!await isPaymentProcessed(newPaymentTransactionId)) {
        const payment =  await Payment.create(payload.data);
    } else {
        return json({error: "Transaction already processed."})
    }
}
The isPaymentProcessed function compares the transaction_id in our collection and checks for duality, if there is no duality then it proceeds to create an entry in our collection with the updateDatabase function.
Step 7: create an endpoint for your webhook. This endpoint will utilise a secret key that we will use as a request header for our webhhok.
import { isPaymentProcessed, updateDatabase } from "../controllers/webhookController.js";
import { Router } from 'express'
export const webhookRouter = Router()

webhookRouter.post('/', async (req, res) => {
    const receivedToken = req.headers['verification-token'];
    if (receivedToken === process.env.WEBHOOK_SECRET_KEY) {
        const payload = req.body;
        // Verify the webhook request
        if (!await isPaymentProcessed(payload.data.transaction_id)) {
            await updateDatabase(payload);
            res.status(200).json({msg:'Webhook received and payment processed'});
        } else {
            res.status(400).json({error:'Payment already processed or invalid'});
        }
    } else {
        res.status(403).status({error:'Webhook verification failed'});
    }
});
An express router is created for this endpoint name webhookRouter, it then references the secret token from the request headers. This token is the unique secret key that will be created by you and added to your webhook configuration on your 100Pay account. It can be any random value you choose to use.
Step 8: Add the webhook endpoint and secret key to your 100Pay account. By navigating to your settings in your 100Pay dashboard, input your webhook URL and secret key in the fields provided. After input, be sure to save the new changes.

Outro
Now you can go ahead and make a payment and watch the magic happen. With that comes the curtains closing, in case you run into errors :) review this article, backtrack your code and you could also refer the official 100Pay official documentation for further clarification. Good luck, hasta luego...